Maserati - Task 14
Assemble the modified dashboard
This task is easier with two people.
Procedure
- Attach the windshield to the dashboard by fitting the windshield to the front of the dashboard.
- Use the screws provided with the car to fasten the windshield to the rear of the dashboard.
IF YOU ARE WORKING ON A PINK CAR SKIP THE NEXT TWO STEPS
These steps are for red cars only
- After the windshield is attached to the dashboard, from the bottom of the dashboard, remove the three screws on the side of the dashboard with the cables, and remove the screw in the center of the dashboard. Save the screws in the magnetic parts bin.
- Store the taped connector inside the dashboard.
All cars continue from here
- Take the dashboard with windshield to the car and set it on top of the opening where it will go when assembled.
- Route the foot-pedal cable (the cable with a black, white, and a taped, red connector) through the hole in the dashboard with the cables.
- Connect the wires from the modified steering wheel to the foot-pedal cable such that:
- The red wire from the steering wheel connects to the white wire of the foot-pedal cable and wrap the union in black vinyl electrical tape.
- The black wire from the steering wheel connects to the black wire of the foot-pedal cable and wrap the union in black vinyl electrical tape.
- The red wire from the foot-pedal cable should still be covered in black, vinyl electrical tape.
- Note that at this point, the steering wheel will just hang from the dash and rest on the floor. This is normal. The steering wheel will be attached in the next step.
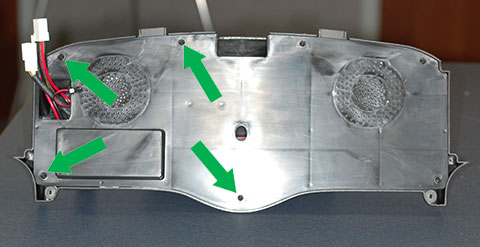
- Reattach the back panel of the dashboard and replace the 4 screws removed in step 3.
- Connect the black connector from the dashboard to the corresponding black connector on the car.
- Connect the three-wire connector from the dashboard to the corresponding connector on the car.
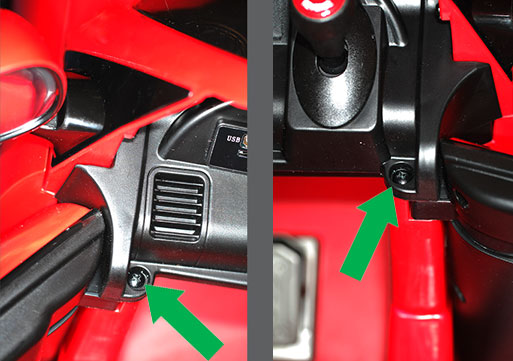
- Place the dashboard and windshield in their location on the car and affix them to the car with the two screws provided with the car. Note that this is a tight fit and might take some effort. The photo shows the locations of the screws that secure the dashboard to the car body.
Verification
Prepare the car for testing
- Verify that the toggle switch is OFF.
- Connect the battery connector in the battery compartment to the car’s power cable.
Preliminary functional test
- Place a block under the car to lift the rear tires off the table so that they are not touching anything. IF THE REAR TIRES ARE IN CONTACT WITH ANYTHING, THE CAR COULD MOVE OFF THE WORK SPACE!
- Press the car’s power button to turn on the car.
- Set the toggle switch to ON and make sure the tires do not turn.
- Press the big, red button on the steering wheel.
- Verify the right rear tire is turning clockwise when the big, red button and stops turning when the button is released.
- If the right rear tire does not behave as described, stop here and check your wiring!
Preparation for next task
- Verify the car’s power switch on the dashboard is off.
- Verify the toggle switch is off.
- Disconnect the battery cable connector in the battery compartment and store the connector on the battery cable behind the battery.
After you confirm that toggle switch is wired correctly, you can continue to the next task.