Maserati - Task 13 - Pink
Modify the dashboard wiring
Note that this is only required for cars that will be operated by hand.
PINK MASERATI
THIS PROCEDURE APPLIES ONLY TO PINK CARS! Visit Maserati - Task 13 - Red if you have a red Maserati.
Procedure
- From the back of the dashboard, remove the seven (7) screws that hold the back panel on.
- Locate the connector that is attached to the back of the forward/reverse switch as shown in the photo.
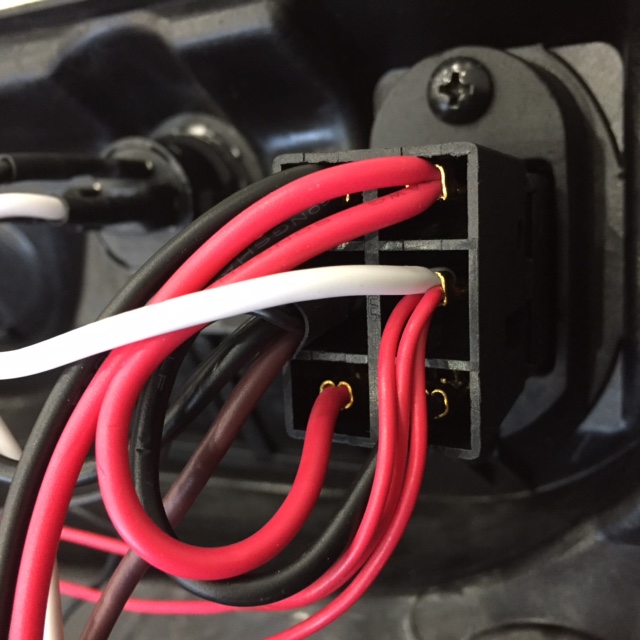
- As close to the connector as possible, cut the long red and long black wires that connect to the forward/reverse switch.
- Locate the black and white wires that connect to the on/off push button.
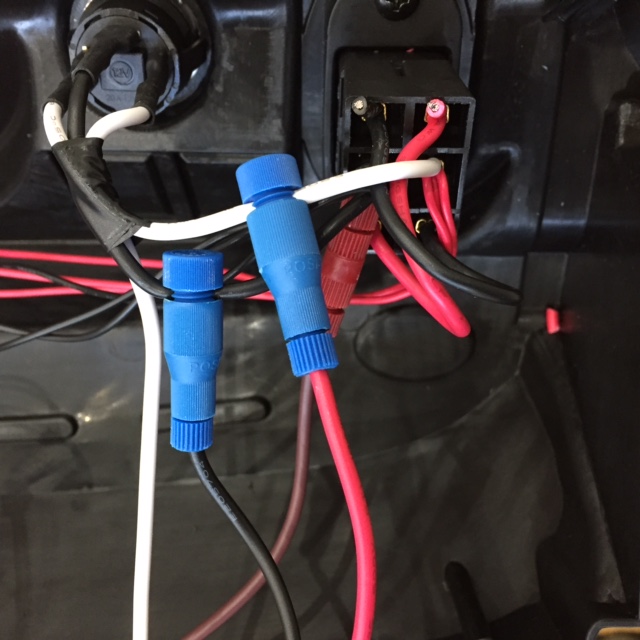
- Connect a blue posi-tap connector to the white wire that goes between the push button and the forward/reverse switch.
- Connect a blue posi-tap connector to the black wire that goes between the push button and the forward/reverse switch.
- Remove 1/4” of insulation from the black wire you cut from the forward/reverse switch and connect it to the posi-tap you attached to the black wire.
- Remove 1/4” of insulation from the red wire you cut from the forward/reverse switch and connect it to the posi-tap you attached to the white wire.
Preliminary Verification
- Set the multi-meter to ohms.
- On the 4-pin connector, touch one probe to the pin attached to the red wire and the other to the pin attached to the white wire.
- The ohmmeter should show contiutity as you push the on/off button (one push should show continuity, another push should show an open circuit.
Electrical test
- Locate the dashboard and place it on top of the car.
- Connect the 4-wire connector from the dashboard to the corresponding connector that is coming out of the car.
- Confirm that the toggle switch is OFF.
- In the battery compartment, connect the battery cable to the power cable.
- Locate the cable that was connected to the foot pedal. You should see a black and white wire with connectors and a red wire with a connector that is taped over.
- Set your multimeter to measure DC volts.
- Place the red (+) lead of the meter in the connector on the white wire and place the black (-) lead of the meter in the connector on the black wire.
- The meter should read zero volts (or very close to zero).
- If it does not read zero volts, stop here and check your wiring!
- Press the car’s power button to turn on the car.
- If the multimeter reads zero volts, turn the toggle switch to ON.
- The multimeter should read between 5.5 and 6.5 volts and the minus (-) sign should not be visible.
- If it does not read a positive 6.0 +/- 0.5 volts, stop here and check your wiring!
- Remove the multimeter leads from the connectors.
- Turn the toggle switch to OFF.
- Press the car’s power pushbutton to turn off the car.
Preliminary functional test
- After successful visual and electrical tests, place a block under the car to lift the rear tires off the table so that they are not touching anything. IF THE REAR TIRES ARE IN CONTACT WITH ANYTHING, THE CAR COULD MOVE OFF THE WORK SPACE!
- With the toggle switch OFF, connect the modified steering wheel such that:
- One of the duplex wires is connected to the white foot-pedal wire (that is not coming out of the hole with the dashboard connectors).
- The other duplex wire is connected to the black foot-pedal wire.
- Press the car’s power button to turn on the car.
- Set the toggle switch to ON and make sure the tires do not turn.
- Press the big, red button on the steering wheel.
- Verify the right rear tire is turning clockwise when the big, red button and stops turning when the button is released.
- If the right rear tire does not behave as described, stop here and check your wiring!
Preparation for next task
- Verify the car’s power switch on the dashboard is off.
- Verify the toggle switch is off.
- Disconnect the battery cable connector in the battery compartment and store the connector on the battery cable behind the battery.
- Disconnect the dashboard connectors from the car.
- Remove the blocks holding up the rear of the car; however keep them handy for use in subsequent tasks.
After you confirm that the wiring is correct with the multimeter and that the wheel turns in the correct direction, you can continue to the next task.